
Table of Contents
- What Vehicle Recovery Points Are and What They Do
- Recovery Points vs Tow Points: Key Differences
- Understanding 4WD Recovery Point Ratings and Working Load Limits
- How to Use Vehicle Recovery Points Safely
- Recovery Point Installation and Fitment Compatibility
- Where Recovery Points Are Located and How They Attach
- Rated vs Unrated Recovery Points: Why the Difference Matters
- Frequently Asked Questions
Last Updated: October 14, 2026
What Vehicle Recovery Points Are and What They Do
A vehicle recovery point is a reinforced attachment location on a vehicle’s chassis engineered to handle the extreme forces of off-road recovery.
Recovery points differ fundamentally from the factory attachment eyes on most vehicles. Manufacturers design tow points for highway towing at controlled speeds with gradual acceleration.
The core purpose is straightforward: they give you a safe, reliable anchor for recovery gear. Whether you’re using a snatch strap, soft shackle, or winch line, the recovery point is where all that force transfers into your vehicle’s structure.
At DriveGear, we stock recovery equipment designed to work with properly rated recovery points. Understanding how these points work, where they’re located, and what their ratings mean is essential before you ever need them.
Recovery Points vs Tow Points: Key Differences
The distinction matters because using the wrong one can destroy your vehicle or fail when you need it most.
Recovery points handle dynamic loads, which spike suddenly. When a snatch strap goes taut, the force peaks almost instantly.
Structural placement differs too. Tow points are often mounted to bumpers or light chassis sections; recovery points bolt directly to reinforced frame sections, distributing force across heavier structural members.
Here’s the practical reality: if your vehicle has factory tow points, they’re suitable for highway towing only. They’re not your vehicle recovery points. Even if you see an eye loop on your bumper, don’t assume it’s rated for recovery work.
Understanding 4WD Recovery Point Ratings and Working Load Limits
Every rated recovery point carries a working load limit, the maximum force it can safely handle. This isn’t an estimate; it’s a tested, verified limit based on destructive testing and engineering analysis.
The working load limit accounts for a safety factor. A recovery point rated at 3,500 kg doesn’t fail at 3,501 kg, it reliably handles 3,500 kg of force under controlled testing without permanent deformation or failure.
Understanding where this rating comes from affects how you use the point. A rated recovery point has been tested to destruction, manufacturers pull until it fails, then set the working limit well below that point. Testing simulates real-world forces, including dynamic shock loads, not just static weight.
How Ratings Are Tested and Verified
Manufacturers use finite element analysis and physical destruction testing to establish ratings. Finite element analysis models the forces flowing through the attachment point and surrounding chassis, identifying stress concentrations and weak points that guide the physical design.
Destruction testing verifies the rating. Engineers bolt the point to a test chassis section and apply force until it fails, then set the working load limit at 50 to 60 percent of the failure point.
Testing also evaluates how the point fails. A good recovery point deforms plastically before catastrophic failure, giving warning signs; a poor design might fail suddenly with none. Rated points are engineered to deform visibly before they break, so you see the damage and know replacement is needed.
Dynamic Forces During Snatch and Winch Recovery
A snatch recovery generates forces that seem impossible until you see them. When a snatch strap goes taut, the recovered vehicle accelerates from zero to moving speed almost instantly, creating a force spike that can reach 2 to 3 times the vehicle’s weight.
A winch recovery is more controlled but still severe. If the vehicle is deeply bogged or stuck on a steep slope, force builds gradually until either the vehicle breaks free or something fails.
The difference between these profiles is critical. A snatch strap creates a sharp spike, high force for a short duration. A winch creates sustained force that builds over seconds.
How to Use Vehicle Recovery Points Safely
Safe recovery starts before you ever need it. Inspect your recovery points before each trip for cracks, corrosion, bent bolts, or loose fasteners.
When setting up a recovery, position yourself and bystanders away from the line of pull. If a strap or line fails, it whips back with tremendous force.
Use rated recovery gear matched to your recovery points. If your point is rated at 3,500 kg, your snatch strap should be rated for at least that load.
Check the attachment method. A shackle should be rated for the same load as the recovery point; a soft shackle equal to or higher.
Choosing the Right Recovery Gear and Attachment Methods
Soft shackles have become the standard for modern recovery work because they’re safer than metal shackles. A soft shackle won’t whip if it fails, it just goes slack; a metal shackle can become a projectile.
Snatch straps should always be rated for at least the working load limit of your recovery points, a 3,500 kg point needs a 3,500 kg or higher strap. Check for abrasion, UV damage, or tears before use; a damaged strap might fail at half its rated capacity.
When attaching gear to your recovery point, use a rated shackle or soft shackle every time.
For winch recovery, attach the winch line to the recovery point via a rated shackle.
Common Mistakes to Avoid
The most common mistake is using unrated or incorrectly rated attachment points. Many people assume any eye loop on a vehicle is suitable for recovery. It’s not.
Another frequent error is overloading a single recovery point. Two points rated at 3,500 kg each don’t allow a 7,000 kg pull on one point, capacity is shared.
Failing to inspect recovery gear before use is dangerous. A snatch strap with UV damage or a corroded shackle might fail unexpectedly. Check your gear every time you pack it.
Using recovery points for non-recovery purposes is also common and problematic. Attaching roof racks, cargo carriers, or tie-downs to recovery points damages the point or the attachment, these aren’t designed for that load profile.
Recovery Point Installation and Fitment Compatibility
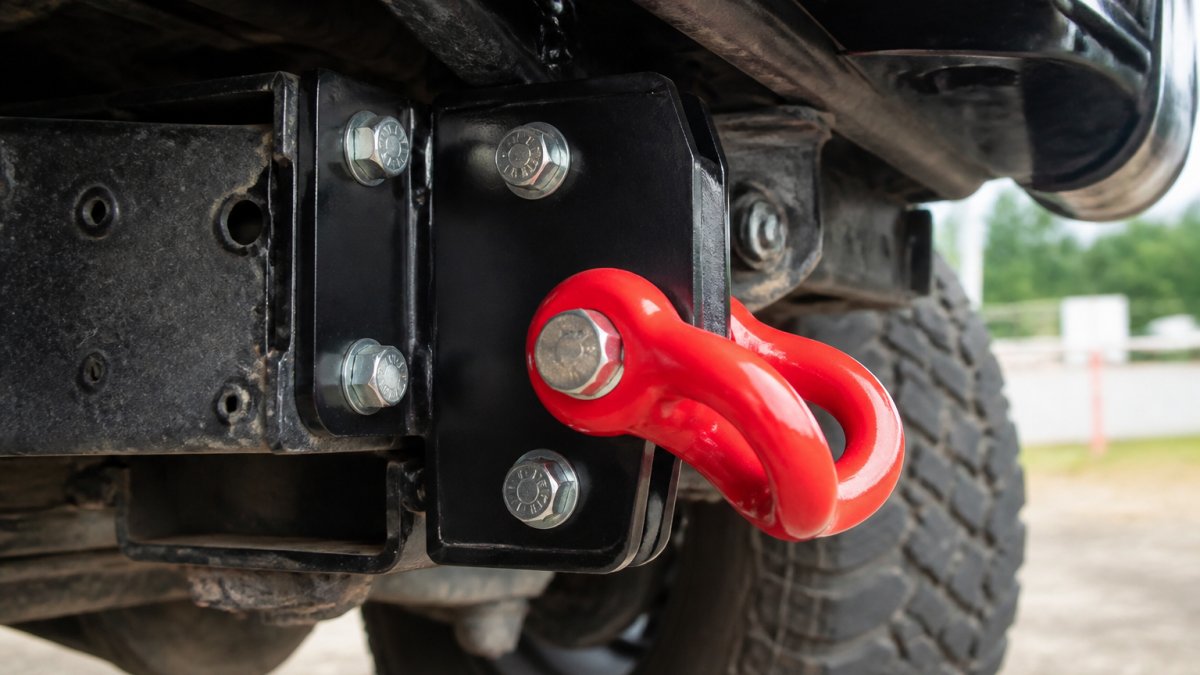
Installing a recovery point requires more than bolting a bracket to the frame. Installation must be vehicle-specific because different chassis designs need different mounting approaches, a point that works on one 4WD model might not fit another, even within the same brand.
Before buying, verify the recovery point is designed for your specific vehicle. Check specifications against your vehicle’s year, model, and chassis type, some manufacturers offer different points for different generations of the same model because the chassis changed.
Vehicle-Specific Mounting and Structural Attachment
Mounting location is critical. A recovery point must attach directly to the chassis frame, not body panels or bumpers, the frame is the only part strong enough to handle recovery forces.
Fasteners are equally important. Recovery points use heavy-duty bolts, usually grade 8 or higher, with lock washers and nylon-insert lock nuts to prevent loosening under vibration or repeated recovery cycles.
The mounting bracket must distribute force across multiple frame members.
Clearance matters too. The recovery point must not interfere with suspension components, exhaust, fuel lines, or other chassis systems, a point that hits the suspension when you articulate will damage both.
Inspection, Maintenance, and Replacement
Inspect your recovery points every six months or before major off-road trips. Look for cracks in the mounting bracket, corrosion on the bolts, or movement when you apply force.
Corrosion is a slow killer. Salt water, mud, and moisture corrode fasteners and brackets, so inspect more frequently if you drive in coastal areas or after river crossings. Corroded bolts lose strength and can fail under recovery stress.
If a recovery point is damaged during a recovery, replace it before using the vehicle again.
When replacing a recovery point, use an OEM or equivalent aftermarket point designed for your vehicle, and follow the manufacturer’s instructions exactly. Improper installation can reduce the point’s effective rating or cause it to fail.
Where Recovery Points Are Located and How They Attach
Most 4WD vehicles have two recovery points, one front and one rear.
Rear recovery points usually mount to the rear chassis section, often integrated into the rear bumper bar or as a separate attachment point.
Some vehicles have additional side recovery points for diagonal pulls or multi-point setups, less common but valuable when a straight pull won’t work.
Attachment always involves bolts penetrating the chassis frame, sized and grade-rated for recovery loads. Washers distribute the load across a larger frame area to prevent pull-through, and lock nuts stop vibration from loosening the bolts.
Rated vs Unrated Recovery Points: Why the Difference Matters
An unrated recovery point has no documented testing behind it. It might be strong enough for some recoveries, but you don’t know its limits. You’re guessing.
A rated recovery point has been tested to failure, and its working load limit is based on that testing. You know exactly what it can handle and can plan around that capacity.
The cost difference is minimal. A rated recovery point costs only slightly more than an unrated one. The safety benefit is enormous.
Recovery points are the foundation of safe off-road recovery. Understanding what they are, how they’re rated, and how to use them properly protects both your vehicle and the people involved in the recovery.
Frequently Asked Questions
Can you use a towbar as a recovery point?
No. Towbars and factory tie-down points are designed for transport and towing loads applied in one direction over long distances. Recovery points are engineered for sudden, dynamic forces from snatch and winch recoveries that occur at extreme angles and intensities. Using a towbar for recovery risks structural failure and vehicle damage. Always use rated recovery points that match your vehicle’s specifications.
What is the difference between a rated recovery point and a tie-down point?
Rated recovery points are tested and certified for dynamic recovery forces, with a published working load limit. Tie-down points are factory attachment locations for transport straps and have no recovery rating. Tie-down points cannot safely handle the extreme, sudden loads of snatch and winch recoveries. Always verify your vehicle’s recovery point rating before attempting any recovery operation.
How do I know if my vehicle has rated recovery points?
Check your vehicle’s owner manual or manufacturer documentation for recovery point location and working load limit. Rated recovery points are usually clearly marked on the chassis with a label showing the load rating. If your vehicle lacks factory recovery points or they are unrated, aftermarket rated recovery points can be installed by a qualified fitter. Verify fitment compatibility with your specific make, model, and year before purchase.
Do recovery points need to be fitted as a pair?
Yes. Recovery should always use a balanced load across a pair of recovery points to distribute force evenly and prevent chassis twisting or deformation. Using a single recovery point concentrates all force on one attachment and risks structural failure. Ensure both points have the same rated capacity and are symmetrically positioned on the chassis. Always connect recovery gear to both points using appropriate shackles or soft shackles rated for the combined load.
What forces are generated during snatch and winch recovery?
Snatch recovery (using momentum and a strap) generates dynamic shock loads that can be 2-3 times the vehicle’s weight, while winch recovery applies steady tension. Both exceed static towing loads significantly. This is why recovery points must be rated and tested for these extreme forces. Unrated attachment points cannot withstand these loads and will fail, risking injury and vehicle damage. Always use rated recovery points and gear rated for the expected load.
How often should recovery points be inspected?
Inspect recovery points before each recovery attempt and at least annually during routine vehicle maintenance. Look for corrosion, cracks, deformation, or loose fasteners. If a recovery point shows visible damage, corrosion, or has been involved in a recovery, have it inspected by a qualified fitter or replaced. Fasteners should be checked for tightness and replaced if corroded or damaged. Proper maintenance ensures your recovery points remain safe and effective.
What attachment methods are safe for connecting recovery gear to recovery points?
Use rated shackles or soft shackles that match or exceed the recovery point’s working load limit. Ensure the attachment method has smooth, rounded edges to prevent strap damage. Never use rope, wire, or unrated fasteners. Connect to both recovery points symmetrically to balance the load. Verify that all gear (strap, shackle, winch hook) is rated for the same or greater load capacity as your vehicle and recovery points. Mismatched gear is a common cause of recovery failure.