
Table of Contents
- What Recovery Boards Are and How They Work in Sand
- Preparing Your Vehicle and Recovery Area
- How to Position Recovery Tracks Under Your Wheels
- Driving on Sand: Tyre Pressure and Throttle Control
- How Many Recovery Boards Do I Need for Sand Recovery
- Alternatives to Recovery Boards for Sand Recovery
- Common Mistakes and Troubleshooting When Recovery Boards Fail
- Frequently Asked Questions
Last Updated: October 16, 2026
What Recovery Boards Are and How They Work in Sand
Recovery boards are rigid, lightweight panels designed to help you understand how to use recovery boards in sand by creating a solid platform your wheels can climb onto and giving your tyres grip on soft, loose sand.
When bogged, your tyres sink into loose sand that offers almost no resistance. Recovery boards place a textured surface directly under your wheels; as you drive forward slowly, your tyres grip the board and gain traction, bridging the gap between your stuck position and firmer ground ahead.
Each board is made from heavy-duty plastic or composite with a raised tread pattern. They’re flat but slightly flexible, conforming to uneven sand while staying rigid enough to support your vehicle’s weight.
Unlike mud or snow, where boards mainly distribute weight, sand recovery relies on texture: your tyres need something to bite into, and smooth surfaces fail. The patterned surface of quality boards gives your tyres grip they can’t find in loose sand alone.
Preparing Your Vehicle and Recovery Area
Before attempting recovery, check your vehicle and the surrounding area to save time and prevent damage.
First, assess how deeply bogged you are. If only the bottom of your tyres touch sand, boards alone might work; if sand reaches your wheel arches or undercarriage, clear sand first.
Check the terrain around your vehicle:
- Look for firmer sand or packed ground ahead
- Identify where you want the boards to sit
- Make sure you have at least 2-3 metres of space to work
- Clear any rocks or debris that could damage the boards
Inspect your vehicle before recovery: check the engine runs smoothly and steering responds normally. If it’s overheating or showing warning lights, wait for it to cool first.
Clear sand from around your tyres and undercarriage with a shovel or your hands, especially at the tyre sides. Sand packed against your vehicle adds weight and reduces traction, so clearing it reduces the effort needed to drive free.
Pay special attention to sand under the body, it acts like a brake. Remove what you can reach without lying under the vehicle.
Check your fuel level: recovery uses more fuel than normal driving, so make sure you have enough to finish and reach firmer ground.
How to Position Recovery Tracks Under Your Wheels
Recovery tracks work best positioned correctly under your driven wheels, angle and placement determine whether your tyres climb onto the boards or slide past them.
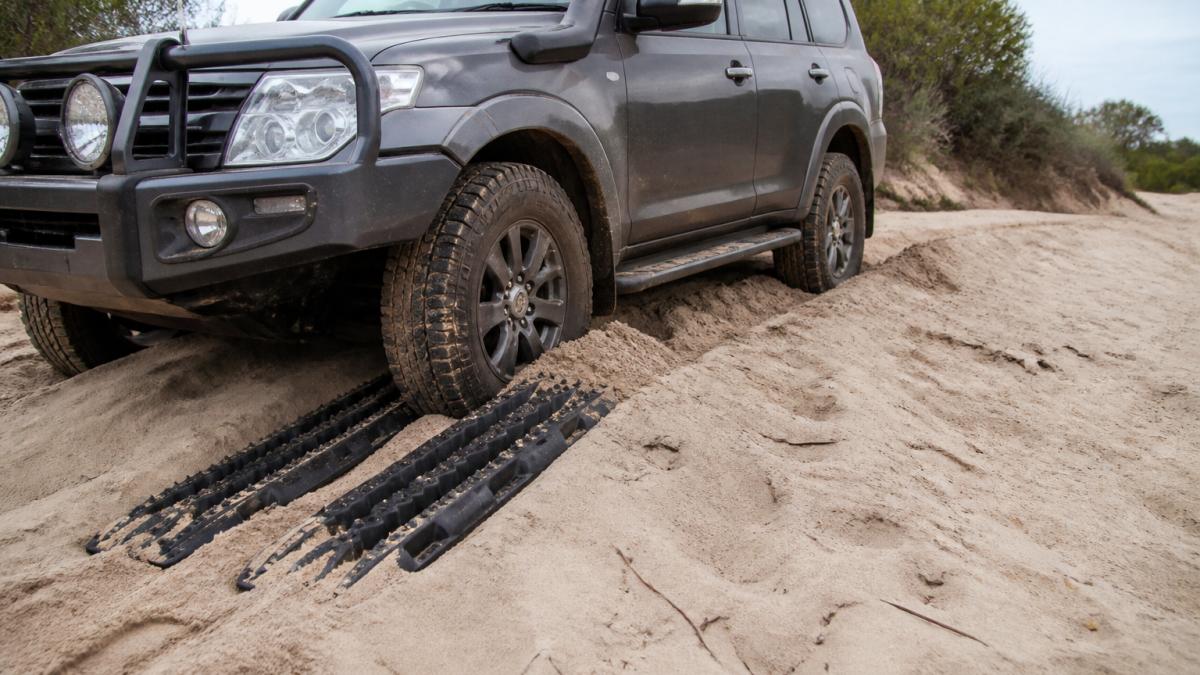
Position the boards at a 30 to 45 degree angle in front of your driven wheels. This angle lets your tyres climb onto the boards smoothly.
For a four-wheel-drive going forward, place boards in front of the front wheels with the leading edge about 30 centimetres ahead of your tyres, angled upward toward your vehicle.
If reversing out, position boards behind the rear wheels the same way, angled toward your vehicle so your tyres can climb onto them.
Wedge the boards firmly into the sand, pushing the leading edge down so it doesn’t slide when your vehicle moves onto it, shifting boards waste effort and can damage your tyres.
For high-clearance vehicles, you may need to stack boards or angle them more steeply. Test the angle with a shallow drive before committing full throttle.
Driving on Sand: Tyre Pressure and Throttle Control
How you drive onto the boards matters as much as positioning: smooth, steady pressure beats aggressive acceleration, and the right tyre pressure lets that pressure translate into grip.
Tyre pressure: context before numbers
There’s no single correct pressure for sand, it depends on vehicle weight, tyre size and construction, load, and sand softness. A lightly loaded small SUV on firm sand may need only a modest reduction, while a heavily loaded four-wheel drive on soft, dry sand may need to go considerably lower.
Follow your vehicle and tyre manufacturer’s guidance first: check the placard inside the driver’s door jamb or fuel filler flap, and the tyre sidewall for the minimum rated pressure. Never go below the stated minimum, even briefly, some run-flat and low-profile tyres have higher minimums and aren’t suitable for aggressive deflation at all.
As a starting point, many experienced drivers drop to the low-to-mid 20s PSI and adjust down if the vehicle still digs in. Treat any online figure as a starting point to test, not a rule: the correct pressure is where your tyres bag out slightly, spread a longer contact patch, and stop trenching.
Extremely low pressures (below roughly 15 PSI) increase the risk of tyre damage, bead separation and rim contact, especially at speed or on uneven ground. If you go very low, keep speed down, avoid sharp turns, and reinflate as soon as you reach firmer ground.
Throttle and momentum
Once tyres are deflated and boards positioned, engage low-range four-wheel drive if available, it gives maximum torque at low speeds, exactly what you need.
Approach the boards slowly at walking pace, driving straight toward them. Let your tyres climb on gradually rather than charging.
Once your front tyres touch the boards, maintain steady throttle and don’t spin the wheels, wheel spin digs you deeper and wastes traction, while steady throttle keeps your tyres gripping.
Drive slowly and steadily forward; most vehicles need only gentle throttle once tyres grip. If you don’t move within a few seconds, stop and check positioning, adjusting the angle often solves it.
Reading the sand as you go
Sand changes over short distances: dry, loose sand over a firmer base behaves differently from deep dry sand, and damp sand near a tide line or after rain grips far better. If your vehicle sinks again as soon as it leaves the boards, the sand ahead is softer, reposition boards further ahead or reduce pressure a little more.
Deflate to a pressure that suits your vehicle, tyres, load and the sand in front of you, not to a number you read online. Then drive onto the boards at walking pace with steady, gentle throttle and no wheel spin.
How Many Recovery Boards Do I Need for Sand Recovery
How many boards you need depends less on the number than on which wheels drive your vehicle and which direction you recover. Placement matters more than owning a fourth board.
Which wheels to target, by drivetrain
- Two-wheel drive (rear-wheel drive): Only the rear wheels drive, so boards go behind the rear tyres if you are reversing out, or you accept that driving forward will not work because the front wheels cannot pull you. In practice, most two-wheel-drive sand recoveries are done in reverse.
- Two-wheel drive (front-wheel drive): Only the front wheels drive, so boards go in front of the front tyres for a forward recovery. Reversing out with boards behind the rear wheels will not help because those wheels are not driven.
- Part-time or full-time four-wheel drive: All four wheels can drive, so you can choose the direction that suits the terrain. Boards go in front of the front tyres for a forward recovery, or behind the rear tyres for a reverse recovery.
- All-wheel drive: All four wheels receive torque, but many systems are biased and may not send full drive to a single axle when one end is unloaded. Boards in front of the front tyres for a forward recovery usually work, but be prepared to reposition if the system struggles to transfer drive.
If you are unsure which wheels drive your vehicle, check the owner’s manual or look for a badge on the tailgate or grille. Getting this wrong is one of the most common reasons a board recovery fails on the first attempt.
Forward or reverse: choosing the direction
Recovering forward is usually preferable, you can see where you’re going and head toward terrain you already scouted. Reverse recovery suits firmer ground behind you, tight spaces, or when the front is dug in deeper than the rear.
Whichever direction you choose, boards go at the driven wheels on the side you’re travelling toward: in front of the front tyres for a forward recovery, behind the rear tyres for a reverse recovery.
How many boards in practice
Two boards are enough for most sand recoveries if placed at the driven wheels in your direction of travel. Position one at each driven wheel, angle them correctly, and your vehicle should drive free.
Four boards give more options: recover in either direction without repositioning, or stage the recovery, front pair first, drive onto firmer ground, then place the rear pair and continue. This works well far from solid ground.
Six or more boards are useful only in extreme situations needing a long path through deep sand; most recoveries don’t need this many.
Larger, heavier vehicles benefit from four boards since weight spreads across more surface area; lighter vehicles often manage with two.
Very soft, deep sand benefits from more boards to spread weight over a larger area; firmer sand with just a loose top layer often needs only two.
Match the boards to the driven wheels and the direction you intend to travel. Two boards at the correct wheels beat four boards at the wrong ones.
Alternatives to Recovery Boards for Sand Recovery
While learning how to use recovery boards in sand works well for most situations, other methods suit different equipment and conditions.
Deflating tyres further can work when only slightly bogged: extremely low pressure (12-15 PSI) creates a massive contact patch, but risks tyre damage and rim contact.
Using natural materials like branches, palm fronds, or cut vegetation creates a rough surface under your tyres.
Winching from another vehicle bypasses boards entirely and is often faster if a winch is available, but needs proper recovery points on both vehicles and suitable anchors.
Digging and pushing with multiple people can free a lightly bogged vehicle: clear sand around the tyres, reduce pressure, and push while the driver applies gentle throttle.
Professional recovery services have heavy equipment and experience. If deeply bogged or attempts fail, calling them saves time and prevents vehicle damage.
Common Mistakes and Troubleshooting When Recovery Boards Fail
Recovery attempts sometimes fail; understanding why helps you fix the problem quickly.
Boards positioned too flat is the most common mistake: nearly level boards let tyres slide over instead of climbing on.
Boards placed too far forward means your tyres can’t reach them.
Wheel spin without forward movement means your tyres aren’t gripping. Stop immediately, spin digs deeper and damages tyres.
Boards sliding under your vehicle means they aren’t wedged firmly. Stop and push them deeper into the sand before retrying, shifting boards waste your effort.
Insufficient tyre deflation leaves tyres too stiff to grip effectively.
Sand under the boards reduces effectiveness. Clear it before driving on, boards sitting on soft sand rather than solid ground lose stability.
Attempting recovery alone without spotters creates safety risks.
If boards fail after multiple attempts, stop and reassess.
Getting stuck in sand is frustrating, but the right technique and equipment make recovery straightforward.
Frequently Asked Questions
What is a recovery board used for?
Recovery boards (also called recovery tracks or traction boards) provide a firm, patterned surface that your tyres can grip when your vehicle is stuck in soft sand, mud, or snow. The boards create traction where loose terrain offers none, allowing your wheels to climb onto them and regain grip. They’re essential for 4WD recovery in off-road situations where digging out manually would be time-consuming and risky.
Do I need 2 or 4 recovery boards for sand recovery?
For most sand recovery situations, two boards (one under each driven wheel) are sufficient if you’re recovering in a forward direction. However, four boards offer greater flexibility, you can position them under all four wheels for maximum traction, or use them for multi-directional recovery if your first attempt fails. Four-wheel-drive vehicles benefit most from four boards when attempting reverse recovery or when the sand is extremely soft.
How should I adjust tyre pressure when driving on sand with recovery boards?
Before attempting recovery, reduce your tyre pressure to improve ground contact and grip. Lower pressure increases the tyre’s footprint on soft sand, helping you climb onto the boards more effectively. However, don’t deflate too far. Always carry a portable compressor to reinflate your tyres once you’re free and heading back to firmer terrain.
What should I do if recovery boards don’t free my vehicle?
First, check that the boards are wedged at the correct angle (30-45 degrees) and that you’ve cleared all sand from around the tyres and undercarriage. If the boards are shifting or sinking, reposition them and try again with steady throttle pressure, avoid spinning the wheels. If the vehicle remains stuck after a second attempt, consider using a rope or recovery strap to a second vehicle, or dig out more sand from underneath the chassis to gain ground clearance before retrying.